
On the show floor at the 2018 Hartford Boat Show
Latest News:
March 20, 2022 - It’s been four long years since writing on this page. The boat has been reliable and gone thru a few upgrades, but not too many. I will be doing more upgrades this spring, although I have also picked up a new project to distract me.
The biggest upgrade last year was new upholstery for the seats, finally, with the help of my awesome friend Nessa. We did it ourselves, she did all the sewing, and I did the covering and stapling. It came out fantastic!
Also last year I built a frame with aluminum angle brackets under the motorwell area, behind the seat, to hold a new 12 gallon gas tank securely in place above the bilge area. This was to replace the typical removable portable 6 gallon tank I had been using for years that slid around in the bilge. I connected this tank to a new fuel port connector that I installed on the hull up behind the backrest so that I didn’t have to remove the seats and pull the tank everytime I wanted to gas up. Along with this change I added a fuel gauge to the dash.
Last year I also moved the battery from behind the seats in the motorwell area, where it constantly slid all over the place, to the center area forward of the seats, to help balance the additional weight of a 12 gallon gas tank. This has been another positive improvement.
This year I plan to add a GPS speedometer and a tachometer to the dash, and then there won’t be room for any more gauges. I also plan to do some paint touchups, replace the decals, and add some supports to reduce vibration in the front, and then start going to some boat shows again!
February 16, 2018 - As a member of the Baystate Woodies antique and classic boat club, I took the boat to the 2018 Hartford Boat Show at the Connecticut Convention Center. It got a lot of nice attention, people taking photographs, etc. Had the decals redone right before the show.
September 25, 2017 - I took the boat to two classic boat shows, one in Salem MA in late August, and another one at Lake Quinsigamond in Shrewsbury MA in early September. The boat did really well at both shows, got a lot of attention and compliments. At the Salem MA ACBS show, I showed the boat on the trailer and it got an award for Best Restoration by Owner. At the Lake Quinsigamond show, I wanted to put it in the water but I had the ignition switch wiring all screwed up and couldn't start it, so I showed it on the trailer. One of the judges told me later that it might have won an award if it was in the water, but I lost 10 points for the boat being on the trailer.
October 12, 2016 - Took it out several different times this past Saturday. Engine ran very well, even though it needs a gasket replaced where I see water leaking out a little. Also, I noticed the lower unit oil was a little milky, which means unfortunately that the lower unit leaks and water is getting in, so I will have to replace some seals over the winter. For now, I am just going to drain and replace the oil every weekend until the end of the season. I also noticed it rocking from bow to stern after filling up the fuel tank, so I think I need to move the battery to the forward area and rebalance it. Overall, really pleased with how it ran.
October 3, 2016 - Really disappointed I didn't take it out all weekend after getting it ready, the weather completely sucked. I added stainless grab handles on both sides, added carpet and secured the seats, and finished off the motorwell steering mount brackets. Before the end of the season I will try to finish the electrical, add decals to the white area on the rear fins, tune the motor, and move the battery and fuel tank to the front. Next year I plan to re-upholster the seats, and maybe add some cleats for towing and tying to the dock. I want to spend more time using it and less time working on it, next year.
September 24/25, 2016 - Finally! Completed all the necessary items for putting it in the water and taking it for a spin, and on both Saturday and Sunday took it out on the water and it ran really well. On Saturday, first I took it out to test drive and rode around a little bit, then went back and brought a friend out with me. Here's where my "temporary" setup and urge to get it out there came back to bite me in the ass. I had the motor clamped only (not bolted), and I had a strip of wood between the transom and the clamps because I felt the clamps were at their limit. The strip of wood was inappropriately too thick, and not wide enough against the transom. So when I pushed it up to around 27 mph, the clamps slipped off the strip of wood. Because the wood was too thick, it made the clamps open very far, and this allowed the motor to slip off the transom and go underwater, held on by the cables. We got towed back to the dock pretty quickly, but the motor was underwater for about 15 or 20 minutes. I looked up online what you have to do to recover and save the motor after being submerged in freshwater, and within about an hour and a half had the motor running again (lucky). Took it out again on Sunday after the motor was properly secured, and it still ran okay. Amazingly, the only thing that broke or got damaged was a piece of wood being used as a steering bracket. I used it as a template and made a copy of the bracket with some 1/8" stainless steel that I had, so now that's permanent as well.
September 15, 2016 - I'm trying really, really hard to get it in the water this weekend. I already sealed the top and bottom half at the lower seam using tons of 3M 5200. Once its cured I just need to put a few of the screws back in. I have also installed the steering wheel, steering rack, throttle/shifter, switches, NAV lights, garboard drain, motorwell drain. What's left that is necessary for putting it in the water - install rub rail, wiring of electrical, install headlights, mount motor, install horn, install fuel tank, attach hull ID plate and registration numbers, install battery, secure the seats, and connect the steering and controls to the motor. For extra credit I could install the carpet.
September 9, 2016 - The boat has been painted red now, just waiting for the stripes hopefully this weekend. You can see the pictures of the red paint before the stripes are added on The Paint page. The red came out great, very well covered, very bright and glossy, minimal defects. As they say, it's all in the prep.
August 17, 2016 - Well, the boat was ready to be painted at the beginning of August, but the painter had just gotten all of his equipment stolen from where he had it stored. He helped me find another painter, and the boat has been there for a couple of weeks because it has been too humid to paint it. I have all the parts ready to finish the boat once it comes back painted.
July 21, 2016 - OK, July 4th didn't happen. My secondary goal was the end of July, which is not happening either. However, it is very close and should be done and in the water in about 3 weeks. I finished all the surface work, painted the interior areas, redid the keel, painted the bottom and put the boat back together, but it is not screwed together and sealed yet. I put in new floatation foam to prevent it from sinking if it ever gets full of water. I have the steering wheel mounted, engine control mounted, and electrical switches mounted (not wired). Got headlights, but they're not installed yet. It's getting inspected tonight for registration purposes, because it does not have a hull ID. Bought the paint and primer for the top, put on one layer of primer, but after a lot of research decided it has to be sprayed, in a booth, it can't be rolled and tipped. Found someone to finish the primer and spray the paint for me in a couple of weeks, and also add some stripes. Gives me just enough time to get everything finalized and repair any little defects. Can't wait!
May 31, 2016 - Got the motor working and now its ready to go, all painted and new decals. The lower unit needed bearings and seals so I got another motor and swapped the lower units. I'll resell the other motor later after I fix the lower unit. I also started working on the bottom, which had never been touched yet. Removed all the bottom paint and found that the keel had some incomplete and poorly done fiberglass work to expand its size, so I started working on it. Got all the materials for prepping and painting the bottom exterior, bottom interior, and top interior. New plan is to get all those surfaces done, painted, and assemble the boat together for final topcoat painting in about two weeks, so that I can get the boat in the water by July 4th.
March 28, 2016 - Okay, it has been a very long time since there was an update. I had to put the boat away for the winter, too cold to work on it. It is still not quite warm enough to begin working on it regularly in the garage or in driveway. However, I did bring the motor in the basement back in January and started working on it. Hoping to finish the motor in the next week or two, by the time the boat can come out of storage.

Before

After
October 6, 2015 - Did a lot of work rebuilding a lip at the outboard well that was completely gone, now it is almost completed. Just need a couple more layers of epoxy, some sanding, and some fairing filler to get it all smooth. Need this lip to wrap over the top of the transom. Also spent the last few days sanding the entire top of the boat down to a consistent smooth feel, and doing small patches here and there for pits and gouges. Finished the headlight areas and hood scoop depression area. Just about ready to flip it over and fill the holes on the rim and do some underneath repairs. Should be ready to send this out for painting in about a week.
September 22 thru Oct 1, 2015 - Finished filling the rivet and screw holes along the top rim of the bottom half, next is to smooth it out and do some fairing work there. Finished smoothing out the dash crack on the top surface, and almost done fixing the depression area on the hood scoop. Getting real tools for block sanding made a huge difference. Big plans for a lot of progress this weekend 10/2 - 10/4.
September 21, 2015 - Started going around the top half of the boat, filling pinholes and other defects, also working on the crack to smooth out the surface.

September 20, 2015 - Finished removing all the bondo. Used a 5" random orbital sander with 60 grit discs, because I found it to be the fastest way to remove the bondo without damaging or shaping the fiberglass substrate. Found that there are a lot of pinholes and other spots needing epoxy repair on the fiberglass.
September 18, 2015 - Been removing bondo whenever I have time, it is probably around 85% removed at this point. Just have to remove it from the outboard well, the walls where the seats go, and in the tight corners that the sander doesn't get. Once that is done, I will have to go over it again to remove deteriorated gelcoat, anyplace it is pitted, etc.
September 10, 2015 - Spent a couple of hours removing bondo with the sander. Decided that I want to remove all of the bondo at this point, so that I can finish the dash crack repair and also so I can see and repair any other fiberglass issues with the top half. I think about 3-5 more hours should get all of the bondo off. But it will take many more hours to sand off all of the deteriorated gelcoat and get down to clean, smooth fiberglass.
September 9, 2015 - Grinded all the bondo off the dash, then cut to shape and glued and clamped a new 1/4" marine ply reinforcement behind the dash for strength. Added thickened epoxy filler to some crack areas, and also some fiberglass layers. Also removed the starter assembly on the motor so I could get to the carburetor, then removed the carburetor. Cleaned the outside of the carb, and will give to a friend who will go through it with a rebuilding kit.
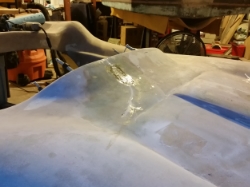
September 8, 2015 - Got a lot done over the labor day weekend. Completely finished the bottom fiberglassing and epoxy layers, and started working on the large crack across the dash.
September 4, 2015 - Not too much added this week, just did some repair work along the top edge of the transom where the separation caused damage. Also I cut to fit a triangular marine ply board that will get glued down in the front, between the floor boards and the bow of the boat, to seal that area and prevent it from collecting water. This weekend (Labor Day) I plan to complete the fiberglassing of the floor and transom, repair the holes in the top edge (of the bottom half) all the way around.
August 31, 2015 - Over the weekend i installed the floor, did more prep work on the transom, and have that whole area just about ready for fiberglass except for the top rim of the transom that still has rivet and screw holes. Also, got the motor started and ran it for a few minutes in a barrel filled with water.
August 29, 2015 - Today I cut and glued down the 3/4" marine plywood floor for the seating area, and added more fillets to the transom area so that it is ready for fiberglassing.
August 28, 2015 - This weekend I plan to install the 3/4" marine plywood floor on top of the stringers and keel board to seal in that whole section of the bottom, and this will become the surface for the seating area. If there is enough time, I may fiberglass the floor and transom together at the same time.